This post is the eighth part of a series of blog posts entitled Creating your own OpenID Connect server with ASOS:
- Introduction
- Choosing the right flow(s)
- Registering the middleware in the ASP.NET Core pipeline
- Creating your own authorization provider
- Implementing the resource owner password credentials grant
- Implementing the authorization code and implicit flows
- Adding custom claims and granting scopes
- Testing your authorization server with Postman
- Conclusion
The sample used in this post can be found in the AspNet.Security.OpenIdConnect.Samples repository, that also hosts the Cordova, MVC and SignalR samples for ASOS.
For clarity, it implements both the authorization code flow and the password flow, but doesn't use any membership stack (the user credentials are hardcoded in the authorization provider class and a fake identity is always used to create tokens).
To test REST services, one of the easiest options is indisputably to use Postman. If you're not already familiar with Postman, I encourage you to read the documentation.
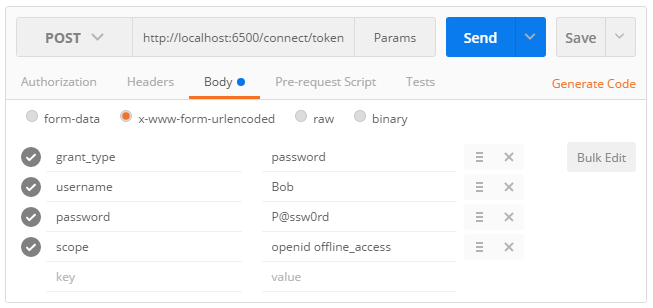
Retrieving an access token using the resource owner password credentials grant
Using the password flow with Postman is quite straightforward:
- Select
POSTas the HTTP method. - Fill the
Request URLinput with the absolute address of the token endpoint. - Click on the
Bodytab and choose thex-www-form-urlencodedencoding. - Add the OAuth 2.0 parameters required by the specification, as shown on this screenshot: