Last week, I received an email from someone who was asking me whether ASOS or OpenIddict could be used with Azure Key Vault (Microsoft's cloud-based Hardware Security Module offer). Since it's quite a recurring question, I thought it was worth writing a blog post to demonstrate how to do that.
So, good news: this is definitely possible! And thanks to a new project released recently by Oren Novotny, this has never been so easy.
What is a Hardware Security Module?
A HSM is a hardened device – generally a PCI board or a standalone appliance – that is exclusively dedicated to cryptographic operations (data encryption/decryption, data signing/verification, key management, etc.). Though HSMs are complex systems, the main idea is actually simple: key material should never leave the HSM's secure enclave, which is protected against physical or digital intrusions.
As such, when a service requires encrypting or signing data (e.g a JWT access token in our case), it has to ask the Hardware Security Module to execute the cryptographic operation on its behalf.
Use Azure Key Vault to sign the JWT tokens issued by ASOS/OpenIddict
Create a new HSM key and register a client application allowed to access it
If you don't have a key yet, you'll have to create one, register a new application in the Azure Active Directory database and grant it an access to your signing key. If you're not familiar with this procedure, I encourage you to read this tutorial or watch the corresponding video:
Azure Key Vault actually offers two pricing tiers: standard and premium. To be able to generate a HSM-protected key (referred to as "hardware key"), you must choose the premium tier when creating your vault. Don't worry, the difference between the two tiers is unbelievably marginal: at the time of writing, $1/month per RSA 2048-bit key.
Register the aspnet-contrib and rsakeyvaultprovider NuGet feeds
To register the required feeds, simply update or add a NuGet.config file at the root of your project:
Install the ASOS/OpenIddict and RSAKeyVaultProvider packages
For that, simply update your .csproj file to register the RSAKeyVaultProvider package and, depending on whether you're usingASOS or OpenIddict, OpenIddict (and OpenIddict.EntityFrameworkCore) or AspNet.Security.OpenIdConnect.Server:
This blog post was written for the ASP.NET Core 2.0 RTM versions of ASOS and OpenIddict, so make sure you're using the corresponding packages and not packages designed for ASP.NET Core 1.x.
Retrieve the RSA security key bundle from Azure Key Vault
If you're already familiar with Azure Key Vault's API, the following snippet should be straightforward. The only particularity is the use of the ToRSA(KeyBundle keyBundle) extension provided by the RSAKeyVaultProvider package.
Its task is simple: returning a RSA instance that delegates the signing and decryption operations – that both require having direct access to the private key and thus can't be executed locally – to Azure Key Vault. This way, when ASOS or OpenIddict will need to sign a JWT access or identity token, they'll indirectly call Azure Key Vault's REST endpoints to generate the precious signature instead of doing that locally.
publicstaticclassKeyVaultHelper { publicstatic RsaSecurityKey GetSigningKey() { // Note: Azure Key Vault's SDK automatically takes care of // renewing access tokens when necessary. You don't need to // handle that yourself as it includes a static cache. var client = new KeyVaultClient(async (authority, resource, scope) => { var context = new AuthenticationContext(authority); var credentials = new ClientCredential("{client identifier}", "{client secret}");
var result = await context.AcquireTokenAsync(resource, credentials); if (result == null) { thrownew InvalidOperationException( "An error occurred while retrieving a token from Azure AD."); }
return result.AccessToken; });
var key = client.GetKeyAsync("{vault URL}", "{key name}").GetAwaiter().GetResult(); if (key == null) { thrownew InvalidOperationException( "An error occurred while retrieving the signing key from Azure Key Vault."); }
returnnew RsaSecurityKey(client.ToRSA(key)); } }
Create custom authorization and test controllers
For the sake of simplicity, I decided to go with a unique authorization controller that can natively work with both ASOS and OpenIddict.
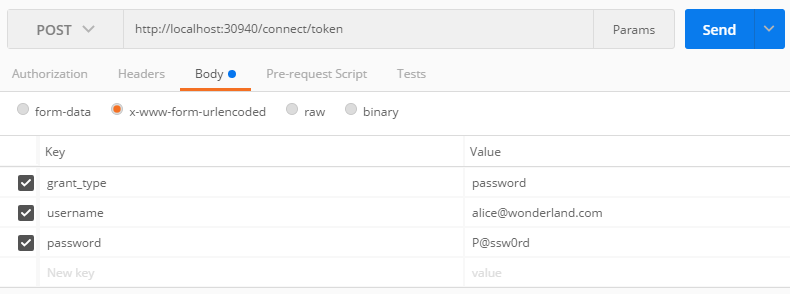
publicclassAuthorizationController : Controller { [HttpPost("~/connect/token")] [Produces("application/json")] public IActionResult Exchange() { var request = HttpContext.GetOpenIdConnectRequest(); if (request.IsPasswordGrantType()) { // Validate the user credentials.
// Note: to mitigate brute force attacks, you SHOULD strongly consider // applying a key derivation function like PBKDF2 to slow down // the password validation process. You SHOULD also consider // using a time-constant comparer to prevent timing attacks. if (request.Username != "alice@wonderland.com" || request.Password != "P@ssw0rd") { return Forbid(OpenIdConnectServerDefaults.AuthenticationScheme); }
// Create a new ClaimsIdentity holding the user identity. var identity = new ClaimsIdentity(OpenIdConnectServerDefaults.AuthenticationScheme); identity.AddClaim(OpenIdConnectConstants.Claims.Subject, "Alice");
var ticket = new AuthenticationTicket( new ClaimsPrincipal(identity), OpenIdConnectServerDefaults.AuthenticationScheme); ticket.SetResources("resource-server");
// Ask ASOS or OpenIddict to generate and return a token response. return SignIn(ticket.Principal, ticket.Properties, ticket.AuthenticationScheme); }
thrownew NotSupportedException("The specified grant type is not supported."); } }
Register ASOS or OpenIddict in the ASP.NET Core pipeline
The handler registration part slightly differs depending on whether you're using ASOS or OpenIddict, but in both cases you'll have the JWT bearer handler and register it as the default scheme in the ASP.NET Core 2.0 authentication options:
.AddJwtBearer(options => { // Note: make sure you're replacing this URL // by the absolute URL of your application. options.Authority = "http://localhost:10444/"; options.Audience = "resource-server"; options.RequireHttpsMetadata = false;
options.SecurityTokenValidators.Clear(); options.SecurityTokenValidators.Add(new JwtSecurityTokenHandler { // Disable the built-in JWT claims mapping feature. InboundClaimTypeMap = new Dictionary<string, string>() }); })
// Register the HSM signing key. options.SigningCredentials.AddKey(KeyVaultHelper.GetSigningKey());
options.AccessTokenHandler = new JwtSecurityTokenHandler { // Disable the built-in JWT claims mapping feature. OutboundClaimTypeMap = new Dictionary<string, string>() };
options.Provider.OnValidateTokenRequest = context => { if (!context.Request.IsPasswordGrantType()) { context.Reject( error: OpenIdConnectConstants.Errors.UnsupportedGrantType, description: "The specified grant type is not supported.");
return Task.CompletedTask; }
context.Skip();
return Task.CompletedTask; };
options.Provider.OnHandleTokenRequest = context => { // Note: SkipHandler() is used to force ASOS to invoke MVC // so that token requests can be handled in a MVC controller. context.SkipHandler();
.AddJwtBearer(options => { // Note: make sure you're replacing this URL // by the absolute URL of your application. options.Authority = "http://localhost:30940/"; options.Audience = "resource-server"; options.RequireHttpsMetadata = false;
options.SecurityTokenValidators.Clear(); options.SecurityTokenValidators.Add(new JwtSecurityTokenHandler { // Disable the built-in JWT claims mapping feature. InboundClaimTypeMap = new Dictionary<string, string>() }); });
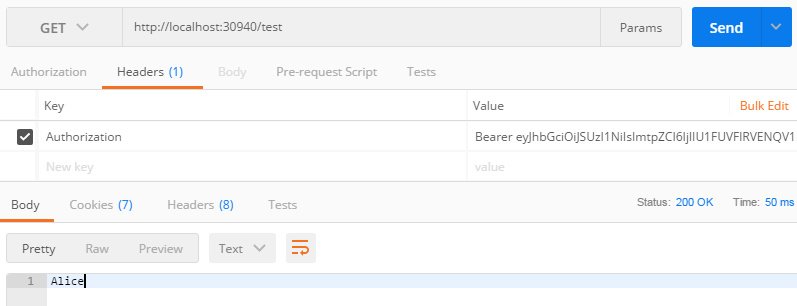
To send an authenticated request, simply attach the bearer token to the Authorization header using the following syntax: Authorization: Bearer [your bearer token] (without the square brackets)
If the access token is valid, you'll get the user identifier as returned by the API:
1
Alice
To confirm that the access token is correctly signed by the HSM key, you can use Application Insights' dependencies tab (you should see an HTTP POST request pointing to https://{vault URL}/keys/{key name}/{key version}/sign?api-version=2016-10-01).