This post is the second part of a series of blog posts entitled Creating your own OpenID Connect server with ASOS:
- Introduction
- Choosing the right flow(s)
- Registering the middleware in the ASP.NET Core pipeline
- Creating your own authorization provider
- Implementing the resource owner password credentials grant
- Implementing the authorization code and implicit flows
- Adding custom claims and granting scopes
- Testing your authorization server with Postman
- Conclusion
ASOS offers built-in support for all the standard flows defined by the OAuth 2.0 and OpenID Connect core specifications: the authorization code flow, the implicit flow, the hybrid flow (which is basically a mix between the first two flows), the resource owner password credentials grant and the client credentials grant.
Though not specific to ASOS, choosing the best flow(s) for your application is an important prerequisite when implementing your own authorization server ; so here's a quick overview of the different OAuth 2.0/OpenID Connect flows:
Non-interactive flows
Resource owner password credentials flow
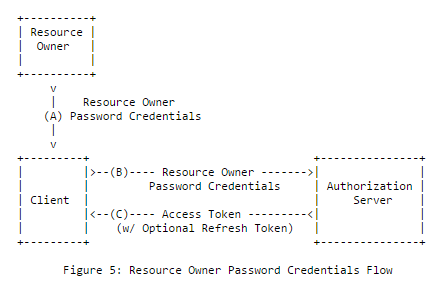
Directly inspired by basic authentication, the resource owner password credentials grant (abbreviated ROPC) is probably the simplest OAuth 2.0 flow: the client application asks the user his username/password, sends a token request to the authorization server with the user credentials (and depending on the client authentication policy defined by the authorization server, its own client credentials) and gets back an access token it can use to retrieve the user's resources.
1 | POST /connect/token |
1 | 200 OK |
Though not recommended by the OAuth 2.0 specification as it's the only flow where the user password is directly exposed to the client application (which breaks the principle of least privilege), the resource owner password credentials grant is one of the most popular flows.
It is is particularly appreciated by SPA writers as it's trivial to implement in vanilla JavaScript, doesn't involve any redirection or consent form and, unlike interactive flows, doesn't require implementing token validation or cross-site request forgery (XSRF) countermeasures to prevent session fixation attacks.
If you don't feel comfortable with the other flows (and the security measures they require on the client-side), using ROPC might be a good option: paradoxically, a client application using ROPC will be far less vulnerable than a client using interactive flows without implementing the appropriate security checks.
As recommended by the OAuth 2.0 specification, you SHOULD NEVER use it with third-party applications. If you want to support applications you don't fully trust, consider using an interactive flow instead (e.g authorization code or implicit flow).
Client credentials grant
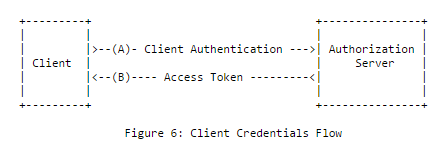
The client credentials grant is almost identical to the resource owner password credentials grant, except it's been specifically designed for client-to-server scenarios (no user is involved in this flow): the client application sends a token request containing its credentials and gets back an access token it can use to query its own resources.
1 | POST /connect/token |
1 | 200 OK |
Unlike the resource owner password credentials grant, client authentication is not optional when using the client credentials grant and ASOS will always reject unauthenticated token requests, as required by the OAuth 2.0 specification.
This means that you CAN'T use the client credentials grant with public applications like JS, mobile or desktop applications, as they are not able to keep their credentials secret.
Interactive flows
Authorization code flow
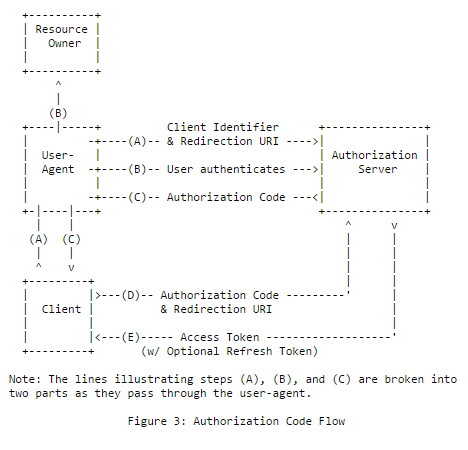
The authorization code flow is probably the most complicated flow as it involves both user-agent redirections and backchannel communication. In return, using this flow with server-side applications has a great advantage: the access_token cannot be intercepted by the user agent.
There are basically 2 steps in the authorization code flow: the authorization request/response and the token request/response.
- Step 1: the authorization request
In this flow, the client application always initiates the authentication process by generating an authorization request including the mandatory response_type=code parameter, its client_id, its redirect_uri and optionally, a scope and a state parameter that allows flowing custom data and helps mitigate XSRF attacks.
In most cases, the client application will simply return a 302 response with a Location header to redirect the user agent to the authorization endpoint, but depending on the OpenID Connect client you're using, POST requests might also be supported to allow you to send large authorization requests. This feature is usually implemented using an auto-post HTML form.
1 | 302 Found |
1 | GET /connect/authorize?response_type=code&client_id=s6BhdRkqt3&state=af0ifjsldkj&redirect_uri=https%3A%2F%2Fclient.example.org%2Fcb |
The way the identity provider handles the authorization request is implementation-specific but in most cases, a consent form is displayed to ask the user if he or she agrees to share his/her personal data with the client application.
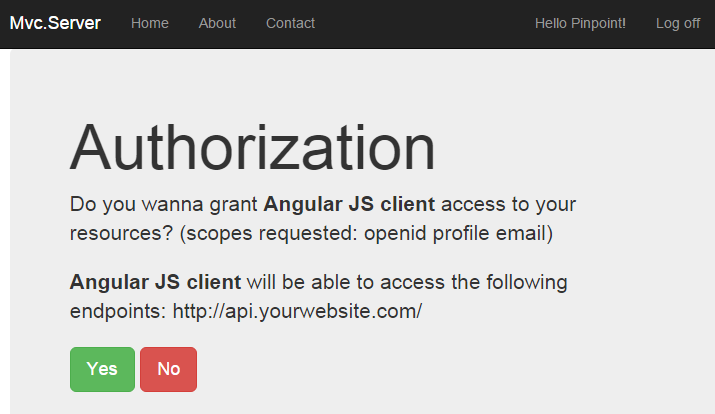
When the consent is given, the user agent is redirected back to the client application with a unique and short-lived token named authorization code that the client will be able to exchange with an access token by sending a token request.
1 | 302 Found |
To prevent XSRF/session fixation attacks, the client application MUST ensure that the state parameter returned by the identity provider corresponds to the original state and stop processing the authorization response if the two values don't match. This is usually done by generating a non-guessable string and a corresponding correlation cookie.
- Step 2: the token request
When the client application gets back an authorization code, it must immediately reedem it for an access token by sending a grant_type=authorization_code token request.
To help the identity provider mitigate counterfeit clients attacks, the original redirect_uri must also be sent.
If the client application is a confidential application (i.e an application that has been assigned client credentials), authentication is required.
1 | POST /connect/token |
1 | 200 OK |
Implicit flow
The implicit flow is similar to the authorization code flow, except there's no token request/response step: the access token is directly returned to the client application as part of the authorization response in the URI fragment (or in the request form when using response_mode=form_post).
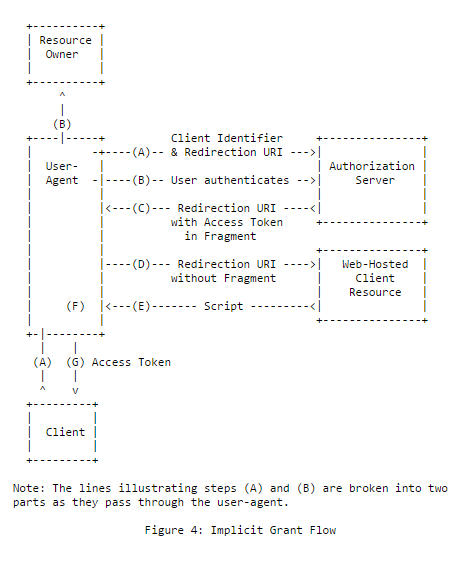
1 | GET /connect/authorize?response_type=token&client_id=s6BhdRkqt3&redirect_uri=https%3A%2F%2Fclient.example.org%2Fcb&scope=openid&state=af0ifjsldkj&nonce=n-0S6_WzA2Mj |
1 | 302 Found |
This flow is inherently less secure than the authorization code flow, but is easier to implement and has been specifically designed for JS applications. Using it with confidential applications is not recommended and authorization servers SHOULD STRONGLY consider rejecting implicit flow requests when the client_id corresponds to a confidential application to prevent downgrade attacks and token leakage.
To prevent XSRF/session fixation attacks, the client application MUST ensure that the state parameter returned by the identity provider corresponds to the original state and stop processing the authorization response if the two values don't match. This is usually done by generating a non-guessable string and a corresponding value stored in the local storage.
When using the implicit flow, the client application MUST also ensure that the access token was not issued to another application to prevent confused deputy attacks. With OpenID Connect, this can be done by using response_type=id_token token and checking the aud claim of the JWT identity token, that must correspond or contain the client_id of the client application.
Still unsure what's the best flow for your app? Here's a quick table to help you:
| Flow/grant | Requires user interaction? | For server-side apps? | For public apps (JS/mobile)? | For third-party apps? |
|---|---|---|---|---|
| Resource owner password credentials | No | Yes | Yes | No |
| Client credentials | No | Yes | No | Yes |
| Authorization code | Yes | Yes | Yes | Yes |
| Implicit | Yes | No | Yes | Yes |
Next part: Registering the middleware in the ASP.NET Core pipeline.