This blog post was updated to use a different method for injecting the channels into the WMC database. The attached tool has been updated accordingly.
After more than 13 years of continuous use, I'm saying goodbye to my traditional Windows Media Center TV setup 😊
Like many (if not most) users, I've always been using Windows Media Center with terrestrial tuners physically attached to my HTPCs:
- A USB dual-tuner Sony PlayTV when I started playing with WMC back in 2008 (an excellent device that's still working just fine).
- A PCI dual-tuner Hauppauge WinTV-NOVA-TD-500.
- A PCIe dual-tuner AVerMedia AVerTV Duo Hybrid (the hardware is good but the driver is terrible and has been responsible for a lot of blue screens...)
- A PCIe quad-tuner Hauppauge WinTV-quadHD – great hardware and great driver! – when I eventually got tired of the crashes caused by the AVerTV Duo Hybrid.
While this setup certainly lacked the flexibility of more elaborate options based on network tuners (like the popular HDHomeRun) or virtualized tuners such as the now defunct DVBLink, it was actually trivial to set up and exceptionally stable, specially since replacing the old TV tuners by newer Hauppauge WinTV-quadHD cards (these things are not only ultra-stable but they also offer low-latency channel switching and have a fairly good reception).
So, why changing something that has been working so well? It all started with a message posted by a user of the My Digital Life forum – acer-5100 – about using Windows Media Center with H.265/HEVC channels.
As you probably already know, due to internal Windows Media Center/DirectShow limitations, only MPEG1, MPEG2 and H.264 channels are supported and it's not possible to watch or record H.265/HEVC channels, even if you install the appropriate DirectShow codecs. Since WMC was abandoned by Microsoft many years ago, it's extremely unlikely we'll ever see an update to make it compatible with HEVC channels.
To work around this limitation, acer-5100 opted for a simple but clever setup that consists in combining DVBLink (and its IPTV source plugin) with Tvheadend: by simply configuring DVBLink to use transcoded streams provided by Tvheadend rather than the original HEVC sources, Windows Media Center always gets a good old MPEG2 or H.264 video stream it can decode without any issue. Simple and clever.
When the French government announced a few years ago that terrestrial television in France would eventually move to DVB-T2 and adopt HEVC and AC4 as the new video and audio codecs, I imagined a similar – but slightly different – setup combining Tvheadend, the HDHomeRun BDA integration and an HDHomeRun emulator usable by Windows Media Center. Sadly, due to the COVID19 pandemic, the DVB-T2/HEVC/AC4 transition was postponed multiple times and the HEVC demo multiplexes never showed up in my region.
A first DVB-T2 multiplex will be progressively deployed in most regions of France later this year, but acer-5100's results were so promising that I decided not to wait for the DVB-T2 mux to be available to start testing these two options:
I initially decided to give acer-5100's DVBLink-based approach a try: thanks to acer-5100, I was able to download the hard-to-find DVBLink 4.1 installer and managed to make the whole thing work after a few attempts. Unfortunately, the result wasn't great: it worked, but the channel switching delay was higher than my traditional setup and I was getting frequent
PlayReady update incompleteerrors that required switching to a different channel before switching back to the channel I wanted to watch (definitely not a great user experience!). After chatting with acer-5100, he confirmed he was also seeing similar errors from time to time. I tried a few other DVBLink versions, but each had its own issues (which surprised me quite a bit as DVBLink has always been a popular option amongst the Windows Media Center enthusiasts).I then decided to give my variant a try: installing the HDHomeRun BDA driver was trivial as even the latest version worked absolutely fine. Once installed, all I needed was an HDHomeRun emulator to make the HDHomeRun BDA driver think it was communicating with a real HDHomeRun device: I initially opted for Antennas, but it wasn't recognized by the HDHomeRun setup utility, most likely because it doesn't emulate all the APIs it needs. I quickly gave up and tried the fantastic HDHRProxyIPTV instead: while it's no longer actively developed and not super easy to configure, it works just fine and is extremely stable.
The Tvheadend + HDHomeRun BDA + HDHRProxyIPTV combo proved to be so good that I decided to experiment it on two machines – a Raspberry PI 3 with a Sony Play TV attached and Tvheadend installed and a Windows 10 machine with Windows Media Center set up - during a whole month.
After a month, the conclusion was clear: not only the channel switching times were comparable to my traditional setup (despite the additional IP latency caused by the use of Ethernet/PLC adapters), but it was also as stable as a physically attached tuner: the flexibility of DVBLink without any of the downsides 😎
I've since replaced the Raspberry PI by a more traditional x64 machine running Ubuntu Server with two Hauppauge WinTV-quadHD PCIe cards attached (as it will be much better at transcoding than a limited ARM SBC), but I haven't changed anything to the client part.
Given that I'm extremely happy with the result, I decided to write this post for those who would be interested in an alternative to DVBLink. While there's nothing terribly complicated, the whole process is of course much more elaborate than simply configuring a physically-attached TV tuner: if you're not willing to get your hands dirty, I would probably not recommend this option 😁
Still reading? Nice! Here's what we'll need for a complete setup:
Tvheadend, that will be used to manage the DVB-T(2) tuners, expose the DVB MPEG Transport Streams via its built-in HTTP server and – if needed – transcode the video streams.
The HDHomeRun BDA driver that is part of the
HDHomeRun Software for Windowspackage.HDHRProxyIPTV, for which you can find an already compiled x86 Windows executable in the GitHub repository of the project: https://github.com/dsaupf/HDHRProxyIPTV/tree/master/Release.
A way to inject the Tvheadend channels in Windows Media Center's database.
Install and configure Tvheadend
While alternatives exist – like the excellent minisatip – Tvheadend is by far the most flexible and user-friendly headend software.
Of course, nothing in this world is perfect and there's a downside: Tvheadend is not available on Windows, so you'll need a Linux machine (Tvheadend itself will work fine on Windows Subsystem for Linux or in more traditional virtual machines, but if you want to use a PCIe or USB tuner to receive terrestrial or satellite TV, it's surely going to be a painful process and the result might not be as stable as you'd expect).
Installing Tvheadend is quite easy, but the configuration part will differ depending on how you receive TV (e.g IPTV, DVB-T, DVB-C, DVB-S or a mix of multiple sources).
Assuming your Linux distribution supports apt, you can use Tvheadend's official APT repository to install the latest version:
1 | curl -1sLf 'https://dl.cloudsmith.io/public/tvheadend/tvheadend/setup.deb.sh' | sudo -E bash |
If you're not familiar with Tvheadend, don't miss the tutorial written by the Pi Mylife Up guys to learn how to configure it: https://pimylifeup.com/raspberry-pi-tvheadend/.
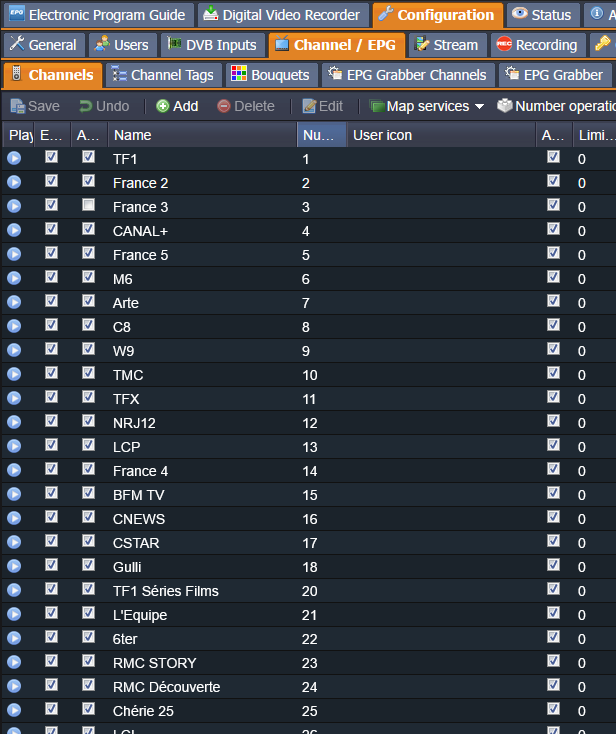
Once everything is correctly configured, you should see the list of channels under the Configuration > Channel/EPG > Channels tab:

Install the HDHomeRun BDA driver
For that, head to https://www.silicondust.com/support/downloads/, download the latest HDHomeRun Software for Windows package and simply follow the installation wizard.
Download and configure HDHRProxyIPTV
An already compiled x86 Windows executable can be found in the GitHub repository of the project alongside the default configuration files: https://github.com/dsaupf/HDHRProxyIPTV/tree/master/Release. Download the 3 files and store them in the same folder but don't start the executable yet.
For those who prefer running HDHRProxyIPTV as a Windows service (which is ideal for a headless WMC recording server), I created a simple installer containing the official .exe from GitHub and a local copy of WinSW 3 that allows using HDHRProxyIPTV.exe as a service (the configuration files are stored alongside these executables in C:\Program Files (x86)\HDHRProxyIPTV, which requires admin rights to edit them).
Of course, since it runs as a service, there's no GUI visible, which can make the debugging process more complicated: in this case, I suggest starting with the "regular" version of HDHRProxyIPTV and switching to the service approach once you have a working HDHRProxyIPTV.ini/HDHRProxyIPTV_MappingList.ini.
You can find the .msi installer here: HDHRProxyIPTV.msi.
Configuring HDHRProxyIPTV is the most complicated part, as there are two distinct files that need to be updated:
HDHRProxyIPTV.ini: it contains theHDHRProxyIPTVconfiguration and all the settings of the emulated HDHomeRun device. Most of the lines should be left as-is, but three options deserve a special attention:The device ID: a default device identifier is already present in the file so you don't have to change it. That said, if you plan on having multiple instances of
HDHRProxyIPTV– for instance if you opt for installing it on each WMC machine as I did (instead of on a centralized server) – you'll need to use different device identifiers for each of yourHDHRProxyIPTVinstances to avoid collisions.The number of tuners: by default, only 2 tuners will be created, but you can select up to 9 tuners (and not 8, as indicated in the file). It's worth noting that the number of virtual tuners exposed to WMC doesn't have to match the number of physical tuners attached to the Tvheadend machine: you can of course select a lower number, but also a higher value if you want to be able to record multiple channels of the same DVB multiplex (in this case, Tvheadend is smart enough to reuse the same physical tuner when the requested channels share the same DVB frequency).
The auto-start option: it is disabled by default but can be set to
1if you want the emulated device to start automatically when theHDHRProxyIPTVexecutable is launched, which is very convenient if you addHDHRProxyIPTVto the list of programs that are started when opening your WIndows session.
HDHRProxyIPTV_MappingList.ini: it contains all the channels that will be accessible by the emulated HDHomeRun device. Each channel has a channel ID that you can set to any value you want and a virtual DVB-T frequency range. Here's an example of a mapping file containing 2 channels:
1 | [MAPPING_LIST] |
While the HDHRProxyIPTV_MappingList.ini file was designed to be edited by hand, it's a terribly boring and error-prone process as soon as you have more than a dozen channels, so we'll see how to automate its creation – and the registration of the corresponding channels in the WMC database – in a few minutes.
If you prefer creating this file manually, here's my recommendations:
To keep things simple, use the Tvheadend channel number for the
Channelline.While you're free to use any value you want for
LowFreqandHighFreq– including real DVB-T frequencies – it's a good idea to use a fake frequency that doesn't match the real frequency of the DVB multiplex the channel belongs to. I personally opted for a simple scheme: the first channel always starts at100001 KHzand we add1 KHzfor each new channel. In any case, the actual value doesn't matter much, as we'll directly inject the channel details into WMC's database instead of performing an actual frequency scan.Once configured, launch
HDHRProxyIPTV.exeand pressStartin the bottom left corner.
Configure the HDHomeRun device
For that, start the HDHomeRun Setup utility (make sure you start HDHomeRun Setup and not HDHomeRun Config GUI!).
Once started, HDHomeRun Setup should initiate a firmware update: of course, since the device is emulated, no actual update will happen, but don't cancel the process: just wait a few moments and the message will eventually disappear.
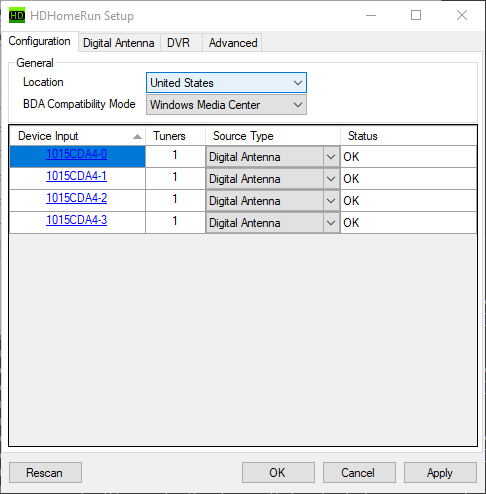
When it's done, ensure the source type of the tuners you want to enable is set to Digital Antenna and click Apply:

Depending on the device ID you chose, the tuners might either appear as individual "sub-devices" or as a single, multi-tuner device: in both cases, things will work exactly the same way and the rest of the process will be identical.
Configure the HDHomeRun tuners in Windows Media Center
If you configured your emulated HDHomeRun device to expose more than 4 tuners, you'll need to tweak WMC to be able to configure more than 4 tuners of the same type. This can be done using TunerSalad or via epg123 (my recommended option).
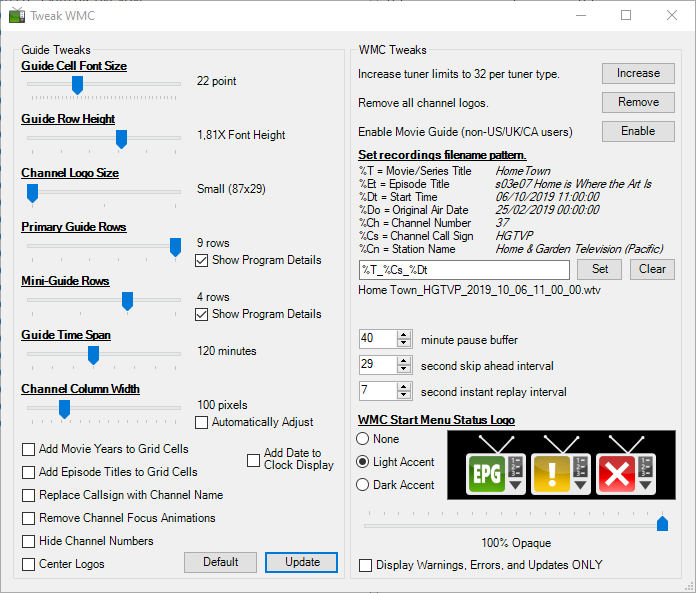
If you opted for epg123, launch epg123Client.exe, click Tweak WMC and press Increase next to Increase tuner limits to 32 per tuner type:

To configure the HDHomeRun tuners in Windows Media Center, go to TV Setup and follow the wizard steps.
HDHRProxyIPTV emulates DVB-T tuners: if you live in a region that uses a different transmission standard (e.g ATSC, commonly used in the United States), you'll need to select a different country – e.g France or United Kingdom – to be able to configure the virtual DVB-T tuners correctly.
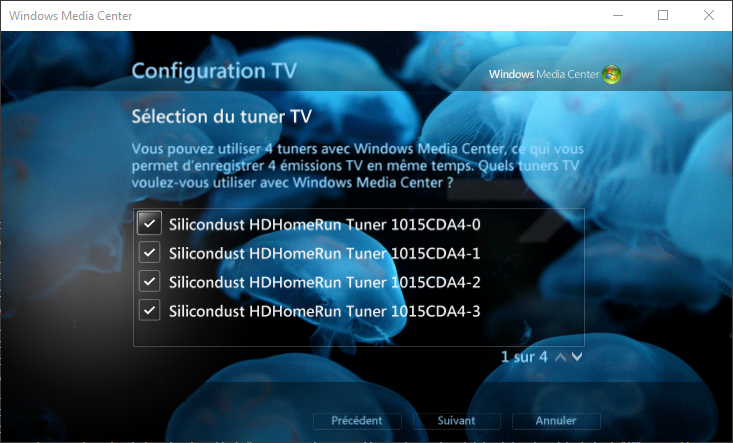
When WMC starts examining the TV signals, click Cancel and select Let me configure my TV signal manually. Then, select Antenna, click Next and ensure all the virtual TV tuners you want to enable are selected:

Then, click Next and when WMC starts searching for new channels, click Stop Scan and finish the setup process.
Inject the Tvheadend channels
Windows Media Center doesn't offer a way to create arbitrary channels via its graphical user interface. Luckily, it's possible to do it programmatically using public APIs that are part of Windows Media Center.
For that, I created a simple .NET Framework 4.8 application that does 4 things:
- It retrieves all the available channels from the Tvheadend server.
- It removes all the existing channels present in the Windows Media Center database and creates a WMC channel for each Tvheadend channel.
- It creates a Tvheadend MPEG pass-through stream profile per channel (profiles previously created by the tool are automatically deleted before recreating them).
- It creates a
HDHRProxyIPTV_MappingList.inifile containing all the channels retrieved from the Tvheadend server.
By default, when Tvheadend extracts the elementary streams associated to a single channel – called Single Program Transport Stream (or SPTS) – from the Multiple Program Transport Stream (or MPTS) returned by the physical tuner, it doesn't preserve the MPEG network ID/transport stream ID/service ID of the original stream and arbitrarily sets all these values to 1.
Unfortunately, when multiple channels share the same exact DVB information, Windows Media Center ends up merging them automatically at some point (a process typically performed by the mcGlidHost executable). While it is possible to disable this mechanism, using the same DVB information has other side-effects like forcing a bogus channel change when recording a program on another channel while already watching live TV.
To prevent that, the tool automatically asks Tvheadend to create stream profiles that enforce a unique service ID per channel and uses this identifier when injecting the channel into the WMC database to produce a unique DvbTuningInfo instance that won't be shared by multiple channels.
1 | <Project Sdk="Microsoft.NET.Sdk"> |
1 | using System; |
If you're not familiar with .NET or don't want to compile it yourself, you can find compiled binaries here:
- Windows 7 version: WmcChannels-Win7-1.1.1.zip.
- Windows 8.1 (and higher) version: WmcChannels-Win8.1-1.1.1.zip.
Using this program is trivial: run WmcChannels.exe and when prompted for the address of the Tvheadend server, enter the complete URL (e.g: http://192.168.1.25:9981/).
If everything was correctly configured, the message Done should appear and a HDHRProxyIPTV_MappingList.ini file should be added to the current directory. Copy it to the folder containing HDHRProxyIPTV.exe and restart the emulated HDHomeRun device.
You can now launch Windows Media Center and confirm the added channels work fine 😁